Identification Guide
This is designed to give you some guidance in the identification of the larger fungi.
Firstly examine the area where the fungus is growing:-
1) The time of year: Spring, Summer, Winter or Autumn: many species will be seasonal or occur all year round.
2) Habitat: Do they grow on wood i.e. SAPROPHYTIC or PARASITIC species, in woodland or parkland under trees (what type?), in grass, moss, or, on moors and heaths?
3) Abundance: How common locally, is the species? Does it grow singly, in groups, troops or rings? Count specimens – are they tufted?
Secondly, examine the appearance of the fungus:-
Check the following carefully
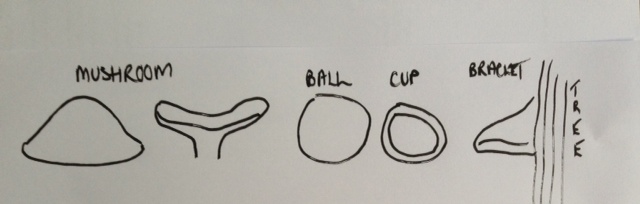
1) Shape:
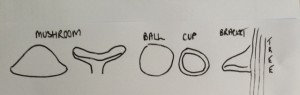
or otherwise
2) Size: record height, width, length (if necessary); with a ruler! Don’t guess as size measurements may be deceptive, large fungi tend to look larger than they actually are!
3) Colour: Check CAP, STEM AND GILL COLOURS for ‘mushroom’ types. Upper and lower surface colours for other types. For ‘mushroom’ types only – cap features can be applied to other fungi such as bracket fungi
4) Cap:
Greasy, sticky or dry?
Striate margin? 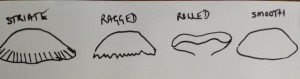 With scales or warts?
Ragged Margin?
Inrolled margin? Is there colour zoning evident?
Most importantly – RECORD THE COLOUR!
5) Stem: again record length, width and shape: uniform bulbous based or tapering
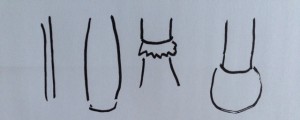
Does it break easily, or is it FIBROUS? Is it hard or soft?
Is there a ring on the stem or a cup (VOLVA) at the base ? RECORD COLOURS!
6) Cap undersurface: GILLS or PORES ? Are they crowded or distant?
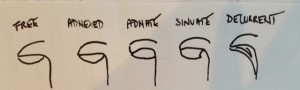
Cut the cap in half and examine how the GILLS meet the stem;-
RECORD COLOUR!
7) Spore print: Cut the stem of the cap and lay the cap on a sheet of white paper with the gill surface downwards: Cover with a glass and leave overnight. In the morning the cap will have left a spore print. This may be white (check rubbing the paper with your finger), pink, brown, purplish-brown or black . See instructions for Making a Spore Print under Education tab.
This is important as it divides the fungus into its family. REMEMBER: Take spore prints from FRESH caps only.
8) Flesh: Cut the cap open and examine the flesh: What colour is it? Is it firm or soft?
9) Smell: Is there any distinctive smell? Maybe foetid, sulphurous, floral, radish, flour, garlic or curry?
ALWAYS MAKE SURE AN EXPERT HAS IDENTIFIED A SPECIES BEFORE GATHERING IT AS AN EDIBLE FUNGUS!
GLOSSARY
FIBROUS: made up of long, thin fibres producing a tough barely breakable structure
GILLS: narrow, slit like structures, producing spores, on the underside of the cap ‘mushroom’ type fungi
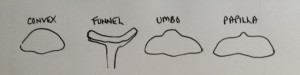
PAPILLA: Narrow projection in the centre of the cap
PARASITIC: living on and feeding off a living organism, giving nothing in return
SAPROPHYTIC: living on and feeding from a dead organism
PORES/TUBES: Spore producing hole structures on underside of cap, some producing sponge like texture
UMBO: A broad projection in the centre of the cap
VOLVA: A cup-like structure at the base of the stem
MYCORRHIZAL: in mutual symbiosis with plant